Introduction
In this chapter, we will discuss some background on Android and install the tools.
TBD
Android is versioned three different ways. Each of them have their own uses, and you will need to understand each of them. This information can be found at Wikipedia if you need to reference it later.
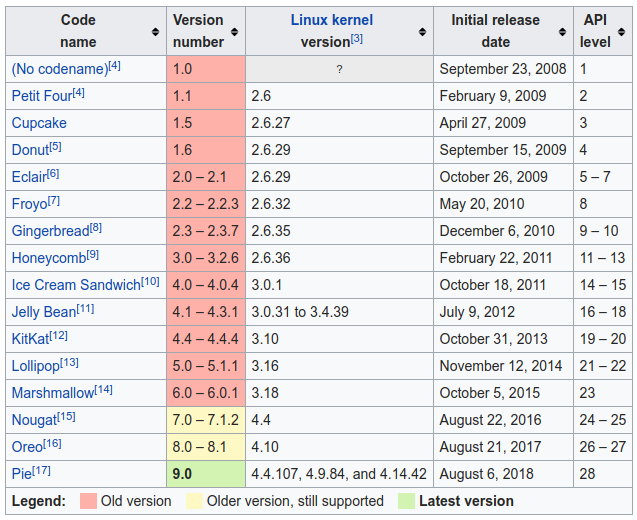
- Code Name is usually referred to when talking about Android versions. For example, "did your phone get the Oreo update"
- Version Number is used when talking about compatibility. For example, "our app supports 4.4 - 8.1"
- API Level is a technical detail. For example, if you look at the API documentation, you can filter on the top-left by the API level you support. Refer to uses-sdk on the android developer website for more info.
The other aspect is version distribution. You can review the most recent statistics on the Distribution Dashboard.
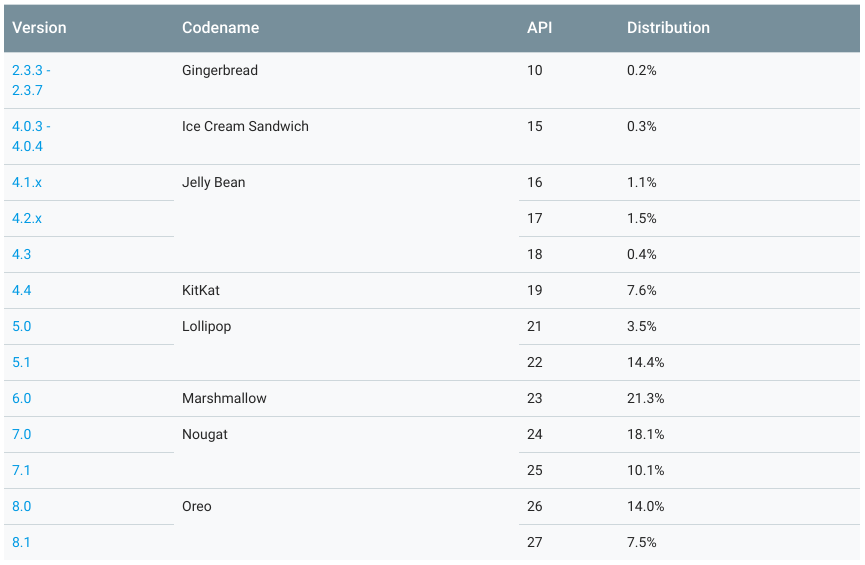
This chart does not show any version that has less than 0.1% user base over the last week. When trying to determine which API levels you need to support, this can come in very handy if you don't have any actual user analytics.
For example, in the chart above, you can see that nothing below API 22 has 10% market share. If you look closely, you will also notice that the newest release, API 28 is not listed either. That is because not enough devices have that version yet.
You might be asking yourself why the latest version is not on all devices.
Let's look at a hypothetical situation to better understand how this process works.
Google releases the latest version as part of the Android Open Source Project. Some proprietary bits are not released, but we will ignore that for now. The AOSP is a set of git repositories.
An OEM (Samsung, Motorola, etc) will then make their own changes to the source code. This would be proprietary changes to frameworks, additional applications, et cetera.
The OEM then makes additional changes for the carrier (AT&T, Verizon, etc). This would be disabling certain competing features (like Tethering or Visual Voicemail), making changes specific to their networks (usually at the device driver) and modifying/adding applications to give a common look and feel.
The device then has to be tested and certified. This process usually takes awhile.
Then the device has to be marketed, usually to fit in with a large holiday like Black Friday or Christmas.
At this point you are probably thinking to yourself that you understand why it would take so long to get a device, but why does it take so long to update a device you already have?
Although updates can be sent OTA (Over The Air) to your device, they often have to go through most, if not all, of those steps. Each company in the process might initiate an update - but it still needs to be integrated and tested before it is released.
On top of that, there is sometimes a newer device getting ready to be released. Older devices tend to fall by the wayside. While not a hard and fast rule, you should not expect any hardware to get more than two major OS updates.
Rather than go into a long and complicated history of which version of Java was supported on which version of Android, let's focus on development you would do right now.
The currently released version of Java (as of Sept 2018) is JDK11.
Android supports a large subset of JDK8. According to Use Java 8 language features, many of the features are only supported on API24 and above. Some functionality, like MethodHandle.invoke require API26.
It is important to note that while that page states that it supports all JDK7 features, there are some JDK5 features (like ServiceLoader) that are not properly supported due to the way Android applications are packaged.
If you are coming from a Java background, your best option today is to plan on Java 8, but be prepared to tweak things that don't quite work correctly.
If you are writing annotation processors, you could get away with writing them in Java 11 - and have those processors output Java 8 code.
Every year Google holds it's annual developer conference, Google I/O. Usually, new devices and OS versions are announced or hinted at. New APIs are announced and others deprecated. Things that were encouraged yesterday are discouraged today, and a new way is shown.
If you look at the version history above, you will see that there is basically a new version every year. With each new version comes (sometimes incompatible) changes.
Sometimes these changes are cosmetic and change how the application looks. Sometimes if affects performance, security or privacy.
No one is expected to implement all of the latest features immediately - but it is a good idea to be aware of them. Not only could they help you develop your application; but sometimes they are mandatory changes.
Expect that the APIs and ecosystems and even the core frameworks will change over time. When designing your application, try to be modular so that you can swap things out. Try to hardcode as little as possible, so that it is easier to update. Try to test your application on the newer versions of the OS as soon as possible, so you know if something will break.
JetBrains launched the Java IDE IntelliJ in 2001. Since that time, they have extended their portfolio to 22 products, including WebStorm, RubyMine, PyCharm and AppCode; to name just a few.
In 2013, Google worked with JetBrains to develop Android Studio. If you are familiar with their other products, Android Studio will feel similar. While the other IDEs are available to install and update via the JetBrains Toolbox, Android Studio needs to be installed and updated manually.
Android Studio is available for Windows, Mac and Linux. Go to the Android Studio Developers Page and scroll to the bottom of the page. There you will find the current system requirements.
If your system meets those requirements, go back to the top of the page, and click the button to install the recommended version. It should be the 64-bit full IDE install.
Once installed, launch Android Studio.

If you need to start Android Studio from the command line (say through a shell script), you can cd into the
binsubdirectory of the install and run./studio.shorstudio.bat. Most people should not need to do so.
On the bottom right of the dialog, click on Configure then SDK Manager.
The SDK Manager is where you will manage the core Android OS versions and tools available to the IDE.
The dialog starts on the SDK Platforms tab. Your window will look something like this:

For production applications, you would want to install each version you support so that you can test customer issues. For now, just enable the Android 9.0 (Pie) line if it is not already enabled and click Apply.
If it is already installed when you open this page (as indicated in the far right column), the
Applybutton will be commented out and you can skip this step. This might be the case if you already had the IDE installed.
Once that has finished, we will move on to the SDK Tools tab. Click it. Your window will look something like this:

For production development, I would recommend enabling as many of these as possible. For today, make sure at least the following are enabled:
- Android SDK Build-Tools
- Android Emulator
- Android SDK Platform-Tools
- Android SDK Tools
- Documentation for Android SDK
- Google Play services
- ConstraintLayout for Android
- Solver for ConstraintLayout
- Android Support Repository
- Google Repository
When you are done, click OK to return to the main dialog.
Another useful tool is the AVD (Android Virtual Device) Manager. It allows you to setup and manage Emulators. Since the AVD Manager can only be run from a working project, we will cover that in the next chapter.
While we are going to be building from the IDE, it is also possible to build from the command line.