Vue3 template là một starter project template giúp các bạn :
- Có một điểm khởi đầu để tạo dự án frontend sử dụng Vue3
- Cung cấp một số template code để code có cấu trúc hơn
- Dự án cũng tích hợp sẵn một số thư viện được sử dụng phổ biến để giúp các bạn khởi đầu nhanh hơn
npm installnpm run devnpm run buildLint with ESLint
npm run lintÝ tưởng xây dựng Vue3 Template xuất phát từ Layered Architecture Style. thường thấy ở xây dựng các ứng dụng backend. Ở backend ta thường thấy có các layer cơ bản như
- Controller
- Service
- Repository
- ...
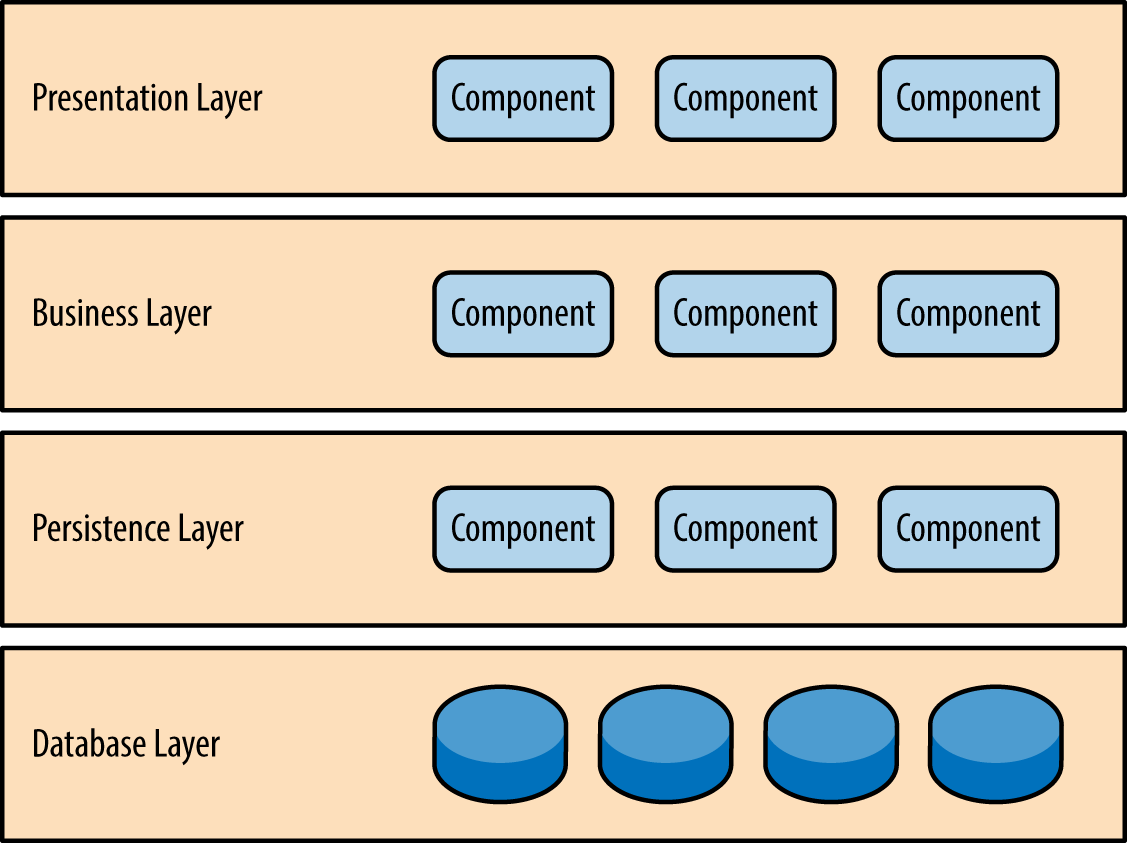
Các lớp này cũng có thể được xây dựng tương tự trên frontend project duy có một điểm khác là :
- Thay vì truy cập database thì chúng ta tiến hành gọi các RESTful API của backend để huỷ thác việc đọc/ghi dữ.
Tại core của mình dự án sử dụng thư viện axios cho việc call API: ./modules/api/axios.ts
import Axios from 'axios'
import type {AxiosInstance, AxiosError, AxiosResponse, InternalAxiosRequestConfig} from 'axios'
import config from '@/modules/api/config'
import {HttpStatus} from "@/utils/enums/http-status.enum";
import {
  ForbiddenException,
  HttpException,
  InternalServerErrorException,
  UnauthorizedException
} from "@/exceptions/http";
import i18n from "@/modules/i18n";

const TOKEN_KEY = 'access_token'

const axios: AxiosInstance = Axios.create(config);

export default axios
Chúng ta có thể coi tầng này như tầng dại diện cho cơ sở dữ liệu, cung cấp việc đọc/ghi dữ liệu
API access layer về cơ bản cung ấp cho chúng ta truy xuất cơ sở dữ liệu thô thông qua API,
tuy nhiên sẽ tiện hơn rất nhiều nếu chúng ta có thể truy xuất vào các "bảng" hay các tài nguyên một cách tường minh hơn.
Bằng cách sử dụng Generic type, trong project template này chúng ta tạo nên một lớp repository tổng quát cho việc access từng tài nguyên.
./repositories/BaseRepository.ts
export class BaseRepository implements BaseRepositoryInterface {
  protected readonly instance: AxiosInstance = axios

  get axiosRef(): AxiosInstance {
    return this.instance
  }

  request<T = any>(config: AxiosRequestConfig): Observable<AxiosResponse<T>> {
    return this.makeObservable<T>(this.instance.request, config)
  }

  delete<T = any>(url: string, config?: AxiosRequestConfig): Observable<AxiosResponse<T>> {
    return this.makeObservable<T>(this.instance.delete, url, config)
  }

  head<T = any>(url: string, config?: AxiosRequestConfig): Observable<AxiosResponse<T>> {
    return this.makeObservable<T>(this.instance.head, url, config)
  }

  post<T = any>(
    url: string,
    data?: any,
    config?: AxiosRequestConfig
  ): Observable<AxiosResponse<T>> {
    return this.makeObservable<T>(this.instance.post, url, data, config)
  }

  put<T = any>(url: string, data?: any, config?: AxiosRequestConfig): Observable<AxiosResponse<T>> {
    return this.makeObservable<T>(this.instance.put, url, data, config)
  }

  get<T = any>(url: string, config?: AxiosRequestConfig): Observable<AxiosResponse<T>> {
    return this.makeObservable<T>(this.instance.get, url, config)
  }
}
Như nhìn thấy ở trên chúng ta cung cấp giao diện đọc ghi ( kiểu CRUD ) cho BaseRepository thông qua việc gọi RESTful API (POST/GET/PUT/DELETE).
Lớp này đã trừu tượng hoá việc truy cập cơ sở dữ liệu giúp các tầng trên có thể uỷ thác việc này cho tầng repository.
BaseRepository là một lớp trừu tượng cơ bản, việc truy cập vào từng tài nguyên sẽ được thực hiện cụ thể dựa trên
- URI cung cấp bởi backend
Chính vì vậy để thao tác với một tài nguyên cụ thể chúng ta cần làm tương tự như dưới đây:
class ProductRepository extends BaseRepository {
   private static readonly url = 'products'  //<-Resource URI
   async findOne(id: number): Promise<ProductEntity> {
      const url = `${ProductRepository.url}/${id}`
      const { data } = await firstValueFrom(
              this.get<ProductEntity>(url).pipe(
                      catchError((error: AxiosError) => {
                         throw error
                      })
              )
      )
      return data
   }
}
Chú ý 2 điểm quan trọng :
- Chúng ta sử dụng resource name (path) để tạo ra URL cần thiết cho việc call API ( ví dụ : products sẽ giúp chương trình hiểu là chúng ta đang call api từ base URL https://<BACKEND_DOMAIN>/products/)
- Chúng ta tiến hành định kiểu dữ liệu trả về từ Axios thông qua việc tạo lớp Entity
interface ProductEntity {
  id: number
  title: string
  price: number
  images: string[]
  description: string
  category: object[]
  creationAt: Date
  updatedAt: Date
}
export type { ProductEntity }
※ Việc định kiểu này sẽ rất hữu ích trong việc đọc và kiểm soát chất lượng code.
Phía trên và sử dụng repository là Service Layer. Nếu tầng repository cung cấp một lớp trừu tượng cho việc truy cập cơ sở dữ liệu thì lớp Service Layer sẽ được sử dụng để thực hiện các business logic. Service là một tầng mở "Open Layer" thay vì là một tầng đóng "Closed Layer" có nghĩa là bạn hoàn toàn có thể thực hiện việc gọi repository trực tiếp từ Component của mình cũng được.
import type { ProductEntity } from '@/entities/ProductEntity'
import ProductRepository from '@/repositories/ProductRepository'
import type GetProductByIdRequest from '@/requests/GetProductByIdRequest'
class ProductService {
  private readonly repository: ProductRepository
  constructor() {
    this.repository = new ProductRepository()
  }
  async getAllProducts(): Promise<ProductEntity[]> {
    return await this.repository.getAllProducts()
  }
  async getProductById(request: GetProductByIdRequest): Promise<ProductEntity> {
    const productId: number = request.id
    return await this.repository.findOne(productId)
  }
}
export default ProductService
Trong ví dụ trên chúng ta có một sink-hole anti-pattern tuy nhiên vì để làm demo nên tạm chấp nhận tại thời điểm hiện tại. Ở đây cần lưu ý là mỗi hàm của service chấp nhận một đối số kiểu Request. Việc bọc tham số vào trong kiểu Request giúp chúng ta thêm một tầng validate dữ liệu trước mỗi lần gọi.
import Request from '@/requests/Request'
import Joi from 'joi'
class GetProductByIdRequest extends Request {
  id: number = 0
  protected readonly schema = Joi.object()
    .keys({
      id: Joi.number().required()
    })
    .options({
      abortEarly: false
    })
}
export default GetProductByIdRequest
Ở đây chúng ta sử dụng thư viện JOI để thực hiện việc validate các parameters trước khi truyền cho service.
Các dữ liệu cần thiết cho request sẽ được liệt kê như các member variable của class.
Lớp cha Request cung cấp một hàm đặc biệt validated được gọi để thực hiện việc validate dữ liệu
class Request {
   protected readonly schema = Joi.object().keys({}).options({
      abortEarly: false
   })
   protected data = {}
   constructor(partial: Partial<Request>) {
      Object.assign(this.data, partial)
   }
   public validated(): any {
      const result = this.schema.validate(this.data)
      if (result.error) {
         // const errorMessage = result.error.details.map((detail)=>detail.message).join();
         const error = result.error
         throw new RequestValidateException(error)
      }
      return this.data
   }
}
※ Trong một số trường hợp các bạn có thể nói rằng việc validate trực tiếp trên view đã diễn ra nên cách làm này thực
sự không cần thiết. Tuy nhiên chúng ta cung cấp một điểm mở cho việc mở rộng việc validate phức tạp hơn thông qua việc
sử dụng và override hàm validated này.
Các VueComponent/Store/... sẽ đóng vai trò là tầng trên cùng, tiếp nhận input của người dùng và thực hiện gọi các service.
export default defineComponent({
   name: 'HomeView',
   components: {
      TheWelcome
   },
   async mounted() {
      /**
       * This is begin of code for test
       */
      const service = new ProductService()
      try {
         const request = new GetProductByIdRequest({ id: 100 } as Partial<GetProductByIdRequest>)
         const validatedRequest = request.validated() as GetProductByIdRequest
         const product = await service.getProductById(validatedRequest)
         return product
      } catch (e: Error) {
         console.log(e.message)
      }
      /**
       * This is end of code for test
       */
   },
})Có một số phần mở rộng đã được thêm vào project của chúng ta bao gồm
- Dự án cung cấp một tập hợp các lớp HTTP Exceptions giúp chúng ta chủ động trong việc ném ra các ngoại lệ phù hợp (
/src/exceptions/http/*.exception.ts) - Chúng ta cũng có thể tự tạo ra HTTP exception riêng để cụ thể hoá lỗi thông qua việc kế thừa lớp HTTPException
Như chúng ta đều biết, Vue cung cấp việc setting 1 handler duy nhất để xử lý toàn bộ các Error không đươc catch bởi ứng dung. Việc này dẫn tới code của handler sẽ phình to nếu xử lý nhiều loại exceptions. Để giải quyết vấn đề này, chúng ta có thể sử dụng mô hình giống như middleware.
import {UnauthorizedException} from "@/exceptions/http";
import {unauthorizedHandler} from "@/modules/handlers/unauthorized.hander";
import type {ComponentPublicInstance} from "vue";
/**
 * Simple handlers modules to handle kinds of Error and Exception
 */
const handlers:Map<string,Handler> = new Map()

export type Handler = {(err: any, instance: ComponentPublicInstance | null, info: string):void }

export function registerHandler(error: string, func: Handler){
  handlers.set(error, func)
}
export function removeHandler(error:string){
  handlers.delete(error)
}
/**
 * Register Handlers
 */
registerHandler(UnauthorizedException.name,unauthorizedHandler)

export const handler:Handler = function(error, instance, info) :void {
  handlers.forEach( (handler, key) => {
    if (error.name === key){
      /**
       * First handler match will be executed and then we stop
       */
      return handler(error,instance,info)
    }
  })
  /**
   * Default handling is logging to console
   */
  console.log(error)
}
Ở đây các handler cho từng loại exceptions sẽ được để trong một file riêng, và được đăng ký vào mảng. Mỗi khi có một exception, handler tổng sẽ được gọi và kiểm tra trong mảng xem exception đó có được đăng ký xử lý bởi một handler nào có sẵn không. Nếu có thì handler đó sẽ được gọi, trong trường hợp không có handler nào đăng ký thì sẽ được xử lý mặc định là log ra console.
Một handler con sẽ có dạng như sau:
import {UnauthorizedException} from "@/exceptions/http";
import {useAuthStore} from "@/stores/auth.store";

export function unauthorizedHandler(error: UnauthorizedException){
    /**
     * UnAuthorizedException has been catch and handled by Axios but we can further do something here like logout
     */
    const authStore = useAuthStore()
    return authStore.logout()
}- Vue I18n đã được tích hợp sẵn sàng để thực hiện việc chuyển đổi ngôn ngữ.
- Message lỗi cũng có thể được dịch thông qua cách làm như sau vì i18n đã được đăng ký thành plugin.
const reason = new UnauthorizedException(i18n.global.t(`http.message.${status}`),{cause:error})- Để việc xây dựng template trở nên dễ dàng hơn, chúng tôi cũng tích hợp sẵn Admin Them có tên là CoreUI
- Với nhu cầu validate thông tin nhập bởi người dùng, chúng tôi cũng đã tích hợp [VeeValidate V4(https://vee-validate.logaretm.com/v4/)
- Để sử dụng với các element của CoreUI chúng tôi cũng đã làm một ví dụ mẫu như sau:
<Form as="div" v-slot="{ errors, isSubmitting }" @submit="onSubmit">
    <CAlert color="danger" :visible="errors.apiError!=null" dismissible @close="() => { errors.apiError=null}">{{errors.apiError}}</CAlert>
    <CForm novalidate class="needs-validation" :validated="validated">
        <h1>Login</h1>
        <p class="text-medium-emphasis">Sign In to your account</p>
        <CInputGroup class="mb-3 has-validation">
            <CInputGroupText>
                <CIcon icon="cil-user"/>
            </CInputGroupText>
            <Field name="username" v-slot="{ field }" rules="required|email">
                <CFormInput
                        v-bind="field"
                        placeholder="Username"
                        autocomplete="username"
                        id="username"
                        name="username"
                        type="text"
                        :invalid="errors.username!=null"
                        :feedback-invalid="errors.username"
                />
            </Field>
        </CInputGroup>
        <CInputGroup class="mb-4 has-validation">
            <CInputGroupText>
                <CIcon icon="cil-lock-locked"/>
            </CInputGroupText>
            <Field name="password" v-slot="{ field }" rules="required|min:8">
                <CFormInput
                        v-bind="field"
                        type="password"
                        placeholder="Password"
                        autocomplete="current-password"
                        name="password"
                        id="password"
                        :invalid="errors.password!=null"
                        :feedback-invalid="errors.password"
                />
            </Field>
        </CInputGroup>
        <CRow>
            <CCol :xs="6">
                <CButton color="primary" class="px-4" type="submit" :disabled="isSubmitting"> Login</CButton>
            </CCol>
            <CCol :xs="6" class="text-right">
                <CButton color="link" class="px-0">
                    Forgot password?
                </CButton>
            </CCol>
        </CRow>
    </CForm>
Như thấy ở trên, chúng tôi đã bọc các CoreUI directive với directive tương ứng của VeeValidate, tạo sự kết nối giữa chúng khiến cho chúng vẫn có thể được validate bởi VeeValidate nhưng hiển thị theo cách CoreUI đã styled.
Chúng tôi cũng tiến hành học tập và tích hợp một số cách sửa lỗi setting project thông qua tuỳ biến config để giúp các bạn không tốn nhiều thời gian config dự án.
- tsconfig
- tailwind config
- postcss config
- eslint config
- vite config ...